> ## Documentation Index
> Fetch the complete documentation index at: https://www.meilisearch.com/docs/llms.txt
> Use this file to discover all available pages before exploring further.
# Update to the latest Meilisearch version
> Learn how to migrate to the latest Meilisearch release.
export const NoticeTag = ({label}) =>
{label}
;
Currently, Meilisearch databases are only compatible with the version of Meilisearch used to create them. The following guide will walk you through using a [dump](/resources/self_hosting/data_backup/dumps) to migrate an existing database from an older version of Meilisearch to the most recent one.
If you're updating your Meilisearch instance on cloud platforms like DigitalOcean or AWS, ensure that you can connect to your cloud instance via SSH. Depending on the user you are connecting with (root, admin, etc.), you may need to prefix some commands with `sudo`.
If migrating to the latest version of Meilisearch will cause you to skip multiple versions, this may require changes to your codebase. [Refer to our version-specific update warnings for more details](#version-specific-warnings).
## Updating Meilisearch Cloud
Log into your Meilisearch Cloud account and navigate to the project you want to update.
Click on the project you want to update. Look for the "General settings" section at the top of the page.
Whenever a new version of Meilisearch is available, you will see an update button next to the "Meilisearch version" field.
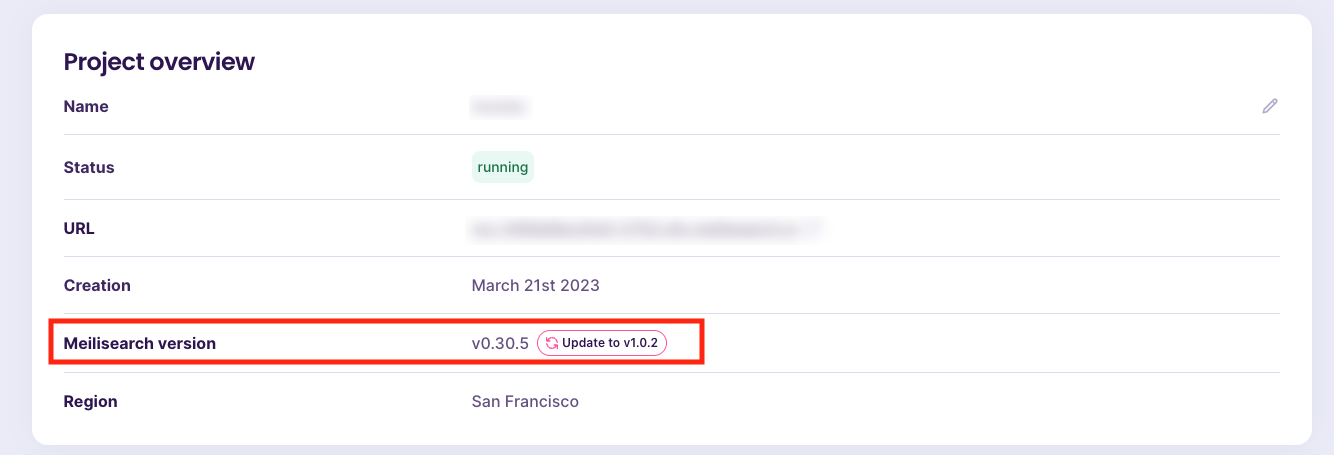 To update to the latest Meilisearch release, click the "Update to v.X.Y.Z" button.
This will open a pop-up with more information about the update process. Read it, then click on "Update". The "Status" of your project will change from "running" to "updating".
To update to the latest Meilisearch release, click the "Update to v.X.Y.Z" button.
This will open a pop-up with more information about the update process. Read it, then click on "Update". The "Status" of your project will change from "running" to "updating".
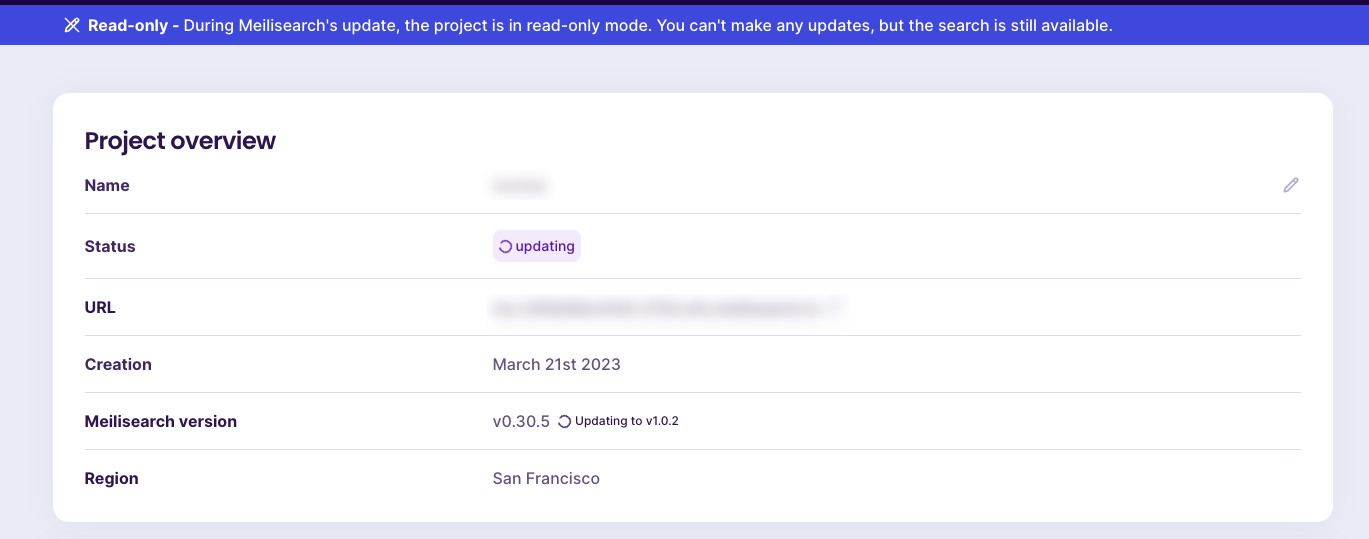 Once the project has been successfully updated, you will receive an email confirming the update and "Status" will change back to "running".
## Updating a self-hosted Meilisearch instance
You may update a self-hosted instance in one of two ways: with or without a dump.
### Dumpless upgrade
Dumpless upgrades are available when upgrading from Meilisearch >=v1.12 to Meilisearch >=v1.13
#### Step 1: Make a backup
Dumpless upgrades are an experimental feature. Because of that, it may in rare occasions partially fail and result in a corrupted database. To prevent data loss, create a snapshot of your instance:
```bash cURL theme={null}
curl \
-X POST 'MEILISEARCH_URL/snapshots'
```
```javascript JS theme={null}
client.createSnapshot()
```
```python Python theme={null}
client.create_snapshot()
```
```php PHP theme={null}
$client->createSnapshot();
```
```java Java theme={null}
client.createSnapshot();
```
```ruby Ruby theme={null}
client.create_snapshot
```
```go Go theme={null}
client.CreateSnapshot()
```
```csharp C# theme={null}
await client.CreateSnapshotAsync();
```
```rust Rust theme={null}
client
.create_snapshot()
.await
.unwrap();
```
```swift Swift theme={null}
let task = try await self.client.createSnapshot()
```
Meilisearch will respond with a partial task object. Use its `taskUid` to monitor the snapshot creation status. Once the task is completed, proceed to the next step.
#### Step 2: Stop the Meilisearch instance
Next, stop your Meilisearch instance.
If you're running Meilisearch locally, stop the program by pressing `Ctrl + c`.
If you're running Meilisearch as a `systemctl` service, connect via SSH to your cloud instance and execute the following command to stop Meilisearch:
```bash theme={null}
systemctl stop meilisearch
```
You may need to prefix the above command with `sudo` if you are not connected as root.
#### Step 3: Install the new Meilisearch binary
Install the latest version of Meilisearch using:
```bash theme={null}
curl -L https://install.meilisearch.com | sh
```
```sh theme={null}
# replace MEILISEARCH_VERSION with the version of your choice. Use the format: `vX.X.X`
curl "https://github.com/meilisearch/meilisearch/releases/download/MEILISEARCH_VERSION/meilisearch-linux-amd64" --output meilisearch --location --show-error
```
Give execute permission to the Meilisearch binary:
```
chmod +x meilisearch
```
For **cloud platforms**, move the new Meilisearch binary to the `/usr/bin` directory:
```
mv meilisearch /usr/bin/meilisearch
```
#### Step 4: Relaunch Meilisearch
Execute the command below to import the dump at launch:
```bash theme={null}
./meilisearch --experimental-dumpless-upgrade
```
```sh theme={null}
meilisearch --experimental-dumpless-upgrade
```
Meilisearch should launch normally and immediately create a new `UpgradeDatabase` task. This task is processed immediately and cannot be canceled. You may follow its progress by using the `GET /tasks?types=UpgradeDatabase` endpoint to obtain its `taskUid`, then querying `GET /tasks/TASK_UID`.
While the task is processing, you may continue making search queries. You may also enqueue new tasks. Meilisearch will only process new tasks once `UpgradeDatabase` is completed.
#### Rolling back an update
If the upgrade is taking too long, or if after the upgrade is completed its task status is set to `failed`, you can cancel the upgrade task.
Cancelling the update task automatically rolls back your database to its state before the upgrade began.
After launching Meilisearch with `--experimental-dumpless-upgrade` flag:
1. Cancel the `upgradeDatabase` task
2. If you cancelled the update before it failed, skip to the next step. If the update failed, relaunch Meilisearch using the binary of the version you were upgrading to
3. Wait for Meilisearch to process your cancellation request
4. Replace the new binary with the binary of the previous version
5. Relaunch Meilisearch
If you are upgrading Meilisearch to \<= v1.14, you must instead [restart your instance from the snapshot](/resources/self_hosting/data_backup/snapshots#starting-from-a-snapshot) you generated during step 1. You may then retry the upgrade, or upgrade using a dump. You are also welcome to open an issue on the [Meilisearch repository](https://github.com/meilisearch/meilisearch).
### Using a dump
#### Step 1: Export data
##### Verify your database version
First, verify the version of Meilisearch that's compatible with your database using the get version endpoint:
```bash cURL theme={null}
curl \
-X GET 'http:///version' \
-H 'Authorization: Bearer API_KEY'
```
The response should look something like this:
```json theme={null}
{
"commitSha": "stringOfLettersAndNumbers",
"commitDate": "YYYY-MM-DDTimestamp",
"pkgVersion": "x.y.z"
}
```
Proceed to [creating the dump](/reference/api/management/create-dump).
##### Create the dump
Before creating your dump, make sure that your [dump directory](/resources/self_hosting/configuration/reference#dump-directory) is somewhere accessible. By default, dumps are created in a folder called `dumps` at the root of your Meilisearch directory.
**Cloud platforms** like DigitalOcean and AWS are configured to store dumps in the `/var/opt/meilisearch/dumps` directory.
If you're unsure where your Meilisearch directory is located, try this:
```bash theme={null}
which meilisearch
```
It should return something like this:
```bash theme={null}
/absolute/path/to/your/meilisearch/directory
```
```bash theme={null}
where meilisearch
```
It should return something like this:
```bash theme={null}
/absolute/path/to/your/meilisearch/directory
```
```bash theme={null}
(Get-Command meilisearch).Path
```
It should return something like this:
```bash theme={null}
/absolute/path/to/your/meilisearch/directory
```
You can then create a dump of your database using the [create a dump endpoint](/reference/api/management/create-dump):
```bash cURL theme={null}
curl \
-X POST 'http:///dumps' \
-H 'Authorization: Bearer API_KEY'
```
The server should return a response that looks like this:
```json theme={null}
{
"taskUid": 1,
"indexUid": null,
"status": "enqueued",
"type": "dumpCreation",
"enqueuedAt": "2022-06-21T16:10:29.217688Z"
}
```
Use the `taskUid` to [track the status](/reference/api/tasks/get-task) of your dump. Keep in mind that the process can take some time to complete.
Once the `dumpCreation` task shows `"status": "succeeded"`, you're ready to move on.
#### Step 2: Prepare for migration
##### Stop the Meilisearch instance
Stop your Meilisearch instance.
If you're running Meilisearch locally, you can stop the program with `Ctrl + c`.
If you're running Meilisearch as a `systemctl` service, connect via SSH to your cloud instance and execute the following command to stop Meilisearch:
```bash theme={null}
systemctl stop meilisearch
```
You may need to prefix the above command with `sudo` if you are not connected as root.
##### Create a backup
Instead of deleting `data.ms`, we suggest creating a backup in case something goes wrong. `data.ms` should be at the root of the Meilisearch binary unless you chose [another location](/resources/self_hosting/configuration/reference#database-path).
On **cloud platforms**, you will find the `data.ms` folder at `/var/lib/meilisearch/data.ms`.
Move the binary of the current Meilisearch installation and database to the `/tmp` folder:
```
mv /path/to/your/meilisearch/directory/meilisearch/data.ms /tmp/
mv /path/to/your/meilisearch/directory/meilisearch /tmp/
```
```
mv /usr/bin/meilisearch /tmp/
mv /var/lib/meilisearch/data.ms /tmp/
```
##### Install the desired version of Meilisearch
Install the latest version of Meilisearch using:
```bash theme={null}
curl -L https://install.meilisearch.com | sh
```
```sh theme={null}
# replace {meilisearch_version} with the version of your choice. Use the format: `vX.X.X`
curl "https://github.com/meilisearch/meilisearch/releases/download/{meilisearch_version}/meilisearch-linux-amd64" --output meilisearch --location --show-error
```
Give execute permission to the Meilisearch binary:
```
chmod +x meilisearch
```
For **cloud platforms**, move the new Meilisearch binary to the `/usr/bin` directory:
```
mv meilisearch /usr/bin/meilisearch
```
#### Step 3: Import data
##### Launch Meilisearch and import the dump
Execute the command below to import the dump at launch:
```bash theme={null}
# replace {dump_uid.dump} with the name of your dump file
./meilisearch --import-dump dumps/{dump_uid.dump} --master-key="MASTER_KEY"
# Or, if you chose another location for data files and dumps before the update, also add the same parameters
./meilisearch --import-dump dumps/{dump_uid.dump} --master-key="MASTER_KEY" --db-path PATH_TO_DB_DIR/data.ms --dump-dir PATH_TO_DUMP_DIR/dumps
```
```sh theme={null}
# replace {dump_uid.dump} with the name of your dump file
meilisearch --db-path /var/lib/meilisearch/data.ms --import-dump "/var/opt/meilisearch/dumps/{dump_uid.dump}"
```
Importing a dump requires indexing all the documents it contains. Depending on the size of your dataset, this process can take a long time and cause a spike in memory usage.
##### Restart Meilisearch as a service
If you're running a **cloud instance**, press `Ctrl`+`C` to stop Meilisearch once your dump has been correctly imported. Next, execute the following command to run the script to configure Meilisearch and restart it as a service:
```
meilisearch-setup
```
If required, set `displayedAttributes` back to its previous value using the [update displayed attributes endpoint](/reference/api/settings/update-displayedattributes).
### Conclusion
Now that your updated Meilisearch instance is up and running, verify that the dump import was successful and no data was lost.
If everything looks good, then congratulations! You successfully migrated your database to the latest version of Meilisearch. Be sure to check out the [changelogs](https://github.com/meilisearch/MeiliSearch/releases).
If something went wrong, you can always roll back to the previous version. Feel free to [reach out for help](https://discord.meilisearch.com) if the problem continues. If you successfully migrated your database but are having problems with your codebase, be sure to check out our [version-specific warnings](#version-specific-warnings).
#### Delete backup files or rollback (*optional*)
Delete the Meilisearch binary and `data.ms` folder created by the previous steps. Next, move the backup files back to their previous location using:
```
mv /tmp/meilisearch /path/to/your/meilisearch/directory/meilisearch
mv /tmp/data.ms /path/to/your/meilisearch/directory/meilisearch/data.ms
```
```
mv /tmp/meilisearch /usr/bin/meilisearch
mv /tmp/data.ms /var/lib/meilisearch/data.ms
```
For **cloud platforms** run the configuration script at the root of your Meilisearch directory:
```
meilisearch-setup
```
If all went well, you can delete the backup files using:
```
rm -r /tmp/meilisearch
rm -r /tmp/data.ms
```
You can also delete the dump file if desired:
```
rm /path/to/your/meilisearch/directory/meilisearch/dumps/{dump_uid.dump}
```
```
rm /var/opt/meilisearch/dumps/{dump_uid.dump}
```
## Version-specific warnings
After migrating to the most recent version of Meilisearch, your codebase may require some changes. For version-specific changes and full changelogs, see the [releases tab on GitHub](https://github.com/meilisearch/meilisearch/releases).
Once the project has been successfully updated, you will receive an email confirming the update and "Status" will change back to "running".
## Updating a self-hosted Meilisearch instance
You may update a self-hosted instance in one of two ways: with or without a dump.
### Dumpless upgrade
Dumpless upgrades are available when upgrading from Meilisearch >=v1.12 to Meilisearch >=v1.13
#### Step 1: Make a backup
Dumpless upgrades are an experimental feature. Because of that, it may in rare occasions partially fail and result in a corrupted database. To prevent data loss, create a snapshot of your instance:
```bash cURL theme={null}
curl \
-X POST 'MEILISEARCH_URL/snapshots'
```
```javascript JS theme={null}
client.createSnapshot()
```
```python Python theme={null}
client.create_snapshot()
```
```php PHP theme={null}
$client->createSnapshot();
```
```java Java theme={null}
client.createSnapshot();
```
```ruby Ruby theme={null}
client.create_snapshot
```
```go Go theme={null}
client.CreateSnapshot()
```
```csharp C# theme={null}
await client.CreateSnapshotAsync();
```
```rust Rust theme={null}
client
.create_snapshot()
.await
.unwrap();
```
```swift Swift theme={null}
let task = try await self.client.createSnapshot()
```
Meilisearch will respond with a partial task object. Use its `taskUid` to monitor the snapshot creation status. Once the task is completed, proceed to the next step.
#### Step 2: Stop the Meilisearch instance
Next, stop your Meilisearch instance.
If you're running Meilisearch locally, stop the program by pressing `Ctrl + c`.
If you're running Meilisearch as a `systemctl` service, connect via SSH to your cloud instance and execute the following command to stop Meilisearch:
```bash theme={null}
systemctl stop meilisearch
```
You may need to prefix the above command with `sudo` if you are not connected as root.
#### Step 3: Install the new Meilisearch binary
Install the latest version of Meilisearch using:
```bash theme={null}
curl -L https://install.meilisearch.com | sh
```
```sh theme={null}
# replace MEILISEARCH_VERSION with the version of your choice. Use the format: `vX.X.X`
curl "https://github.com/meilisearch/meilisearch/releases/download/MEILISEARCH_VERSION/meilisearch-linux-amd64" --output meilisearch --location --show-error
```
Give execute permission to the Meilisearch binary:
```
chmod +x meilisearch
```
For **cloud platforms**, move the new Meilisearch binary to the `/usr/bin` directory:
```
mv meilisearch /usr/bin/meilisearch
```
#### Step 4: Relaunch Meilisearch
Execute the command below to import the dump at launch:
```bash theme={null}
./meilisearch --experimental-dumpless-upgrade
```
```sh theme={null}
meilisearch --experimental-dumpless-upgrade
```
Meilisearch should launch normally and immediately create a new `UpgradeDatabase` task. This task is processed immediately and cannot be canceled. You may follow its progress by using the `GET /tasks?types=UpgradeDatabase` endpoint to obtain its `taskUid`, then querying `GET /tasks/TASK_UID`.
While the task is processing, you may continue making search queries. You may also enqueue new tasks. Meilisearch will only process new tasks once `UpgradeDatabase` is completed.
#### Rolling back an update
If the upgrade is taking too long, or if after the upgrade is completed its task status is set to `failed`, you can cancel the upgrade task.
Cancelling the update task automatically rolls back your database to its state before the upgrade began.
After launching Meilisearch with `--experimental-dumpless-upgrade` flag:
1. Cancel the `upgradeDatabase` task
2. If you cancelled the update before it failed, skip to the next step. If the update failed, relaunch Meilisearch using the binary of the version you were upgrading to
3. Wait for Meilisearch to process your cancellation request
4. Replace the new binary with the binary of the previous version
5. Relaunch Meilisearch
If you are upgrading Meilisearch to \<= v1.14, you must instead [restart your instance from the snapshot](/resources/self_hosting/data_backup/snapshots#starting-from-a-snapshot) you generated during step 1. You may then retry the upgrade, or upgrade using a dump. You are also welcome to open an issue on the [Meilisearch repository](https://github.com/meilisearch/meilisearch).
### Using a dump
#### Step 1: Export data
##### Verify your database version
First, verify the version of Meilisearch that's compatible with your database using the get version endpoint:
```bash cURL theme={null}
curl \
-X GET 'http:///version' \
-H 'Authorization: Bearer API_KEY'
```
The response should look something like this:
```json theme={null}
{
"commitSha": "stringOfLettersAndNumbers",
"commitDate": "YYYY-MM-DDTimestamp",
"pkgVersion": "x.y.z"
}
```
Proceed to [creating the dump](/reference/api/management/create-dump).
##### Create the dump
Before creating your dump, make sure that your [dump directory](/resources/self_hosting/configuration/reference#dump-directory) is somewhere accessible. By default, dumps are created in a folder called `dumps` at the root of your Meilisearch directory.
**Cloud platforms** like DigitalOcean and AWS are configured to store dumps in the `/var/opt/meilisearch/dumps` directory.
If you're unsure where your Meilisearch directory is located, try this:
```bash theme={null}
which meilisearch
```
It should return something like this:
```bash theme={null}
/absolute/path/to/your/meilisearch/directory
```
```bash theme={null}
where meilisearch
```
It should return something like this:
```bash theme={null}
/absolute/path/to/your/meilisearch/directory
```
```bash theme={null}
(Get-Command meilisearch).Path
```
It should return something like this:
```bash theme={null}
/absolute/path/to/your/meilisearch/directory
```
You can then create a dump of your database using the [create a dump endpoint](/reference/api/management/create-dump):
```bash cURL theme={null}
curl \
-X POST 'http:///dumps' \
-H 'Authorization: Bearer API_KEY'
```
The server should return a response that looks like this:
```json theme={null}
{
"taskUid": 1,
"indexUid": null,
"status": "enqueued",
"type": "dumpCreation",
"enqueuedAt": "2022-06-21T16:10:29.217688Z"
}
```
Use the `taskUid` to [track the status](/reference/api/tasks/get-task) of your dump. Keep in mind that the process can take some time to complete.
Once the `dumpCreation` task shows `"status": "succeeded"`, you're ready to move on.
#### Step 2: Prepare for migration
##### Stop the Meilisearch instance
Stop your Meilisearch instance.
If you're running Meilisearch locally, you can stop the program with `Ctrl + c`.
If you're running Meilisearch as a `systemctl` service, connect via SSH to your cloud instance and execute the following command to stop Meilisearch:
```bash theme={null}
systemctl stop meilisearch
```
You may need to prefix the above command with `sudo` if you are not connected as root.
##### Create a backup
Instead of deleting `data.ms`, we suggest creating a backup in case something goes wrong. `data.ms` should be at the root of the Meilisearch binary unless you chose [another location](/resources/self_hosting/configuration/reference#database-path).
On **cloud platforms**, you will find the `data.ms` folder at `/var/lib/meilisearch/data.ms`.
Move the binary of the current Meilisearch installation and database to the `/tmp` folder:
```
mv /path/to/your/meilisearch/directory/meilisearch/data.ms /tmp/
mv /path/to/your/meilisearch/directory/meilisearch /tmp/
```
```
mv /usr/bin/meilisearch /tmp/
mv /var/lib/meilisearch/data.ms /tmp/
```
##### Install the desired version of Meilisearch
Install the latest version of Meilisearch using:
```bash theme={null}
curl -L https://install.meilisearch.com | sh
```
```sh theme={null}
# replace {meilisearch_version} with the version of your choice. Use the format: `vX.X.X`
curl "https://github.com/meilisearch/meilisearch/releases/download/{meilisearch_version}/meilisearch-linux-amd64" --output meilisearch --location --show-error
```
Give execute permission to the Meilisearch binary:
```
chmod +x meilisearch
```
For **cloud platforms**, move the new Meilisearch binary to the `/usr/bin` directory:
```
mv meilisearch /usr/bin/meilisearch
```
#### Step 3: Import data
##### Launch Meilisearch and import the dump
Execute the command below to import the dump at launch:
```bash theme={null}
# replace {dump_uid.dump} with the name of your dump file
./meilisearch --import-dump dumps/{dump_uid.dump} --master-key="MASTER_KEY"
# Or, if you chose another location for data files and dumps before the update, also add the same parameters
./meilisearch --import-dump dumps/{dump_uid.dump} --master-key="MASTER_KEY" --db-path PATH_TO_DB_DIR/data.ms --dump-dir PATH_TO_DUMP_DIR/dumps
```
```sh theme={null}
# replace {dump_uid.dump} with the name of your dump file
meilisearch --db-path /var/lib/meilisearch/data.ms --import-dump "/var/opt/meilisearch/dumps/{dump_uid.dump}"
```
Importing a dump requires indexing all the documents it contains. Depending on the size of your dataset, this process can take a long time and cause a spike in memory usage.
##### Restart Meilisearch as a service
If you're running a **cloud instance**, press `Ctrl`+`C` to stop Meilisearch once your dump has been correctly imported. Next, execute the following command to run the script to configure Meilisearch and restart it as a service:
```
meilisearch-setup
```
If required, set `displayedAttributes` back to its previous value using the [update displayed attributes endpoint](/reference/api/settings/update-displayedattributes).
### Conclusion
Now that your updated Meilisearch instance is up and running, verify that the dump import was successful and no data was lost.
If everything looks good, then congratulations! You successfully migrated your database to the latest version of Meilisearch. Be sure to check out the [changelogs](https://github.com/meilisearch/MeiliSearch/releases).
If something went wrong, you can always roll back to the previous version. Feel free to [reach out for help](https://discord.meilisearch.com) if the problem continues. If you successfully migrated your database but are having problems with your codebase, be sure to check out our [version-specific warnings](#version-specific-warnings).
#### Delete backup files or rollback (*optional*)
Delete the Meilisearch binary and `data.ms` folder created by the previous steps. Next, move the backup files back to their previous location using:
```
mv /tmp/meilisearch /path/to/your/meilisearch/directory/meilisearch
mv /tmp/data.ms /path/to/your/meilisearch/directory/meilisearch/data.ms
```
```
mv /tmp/meilisearch /usr/bin/meilisearch
mv /tmp/data.ms /var/lib/meilisearch/data.ms
```
For **cloud platforms** run the configuration script at the root of your Meilisearch directory:
```
meilisearch-setup
```
If all went well, you can delete the backup files using:
```
rm -r /tmp/meilisearch
rm -r /tmp/data.ms
```
You can also delete the dump file if desired:
```
rm /path/to/your/meilisearch/directory/meilisearch/dumps/{dump_uid.dump}
```
```
rm /var/opt/meilisearch/dumps/{dump_uid.dump}
```
## Version-specific warnings
After migrating to the most recent version of Meilisearch, your codebase may require some changes. For version-specific changes and full changelogs, see the [releases tab on GitHub](https://github.com/meilisearch/meilisearch/releases).